Open Tournament  Round 2
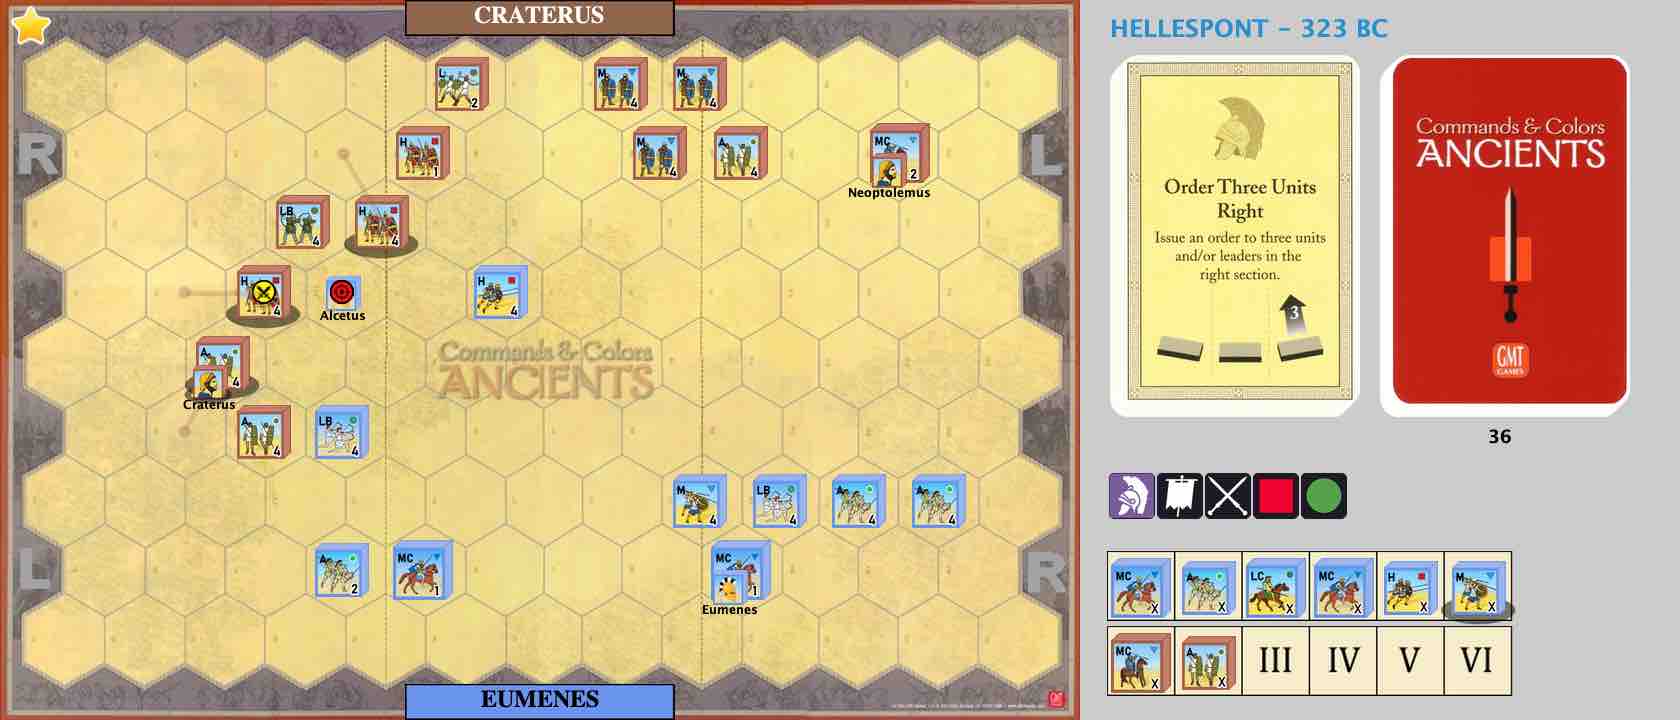
Scenario: 112 Hellespont (323 BC)        
Player 1 Game 1 Game 2 POINTS Player 2 Game 1 Game 2 POINTS
gottoman 6 6 3 toganalper 5 0 0
taliapharaoh 5 6 1.5 TTK 6 5 1.5
Marco 3 6 1 Bangla 6 5 2
mk20336 6 6 3 Renaud 1 1 0
Stanislav27 6 6 3 EZPickins 2 4 0
Gonzo 6 6 3 Alister 4 4 0
Hank 5 forfeit withdraw Dawnreader 6 6 3
Polonus100 6 6 3 stephent 4 1 0
azzy 6 3 1.5 Rand 3 6 1.5
RiverWanderer 6 6 3 LiamBN 2 2 0
g1ul10 6 2 1 Mark-McG 5 6 2
GomJabbar 6 2 1 Andygor 4 6 2
PCScipio42 2 6 1 Moose 6 4 2
Cavie 6 1 1 Benlore 2 6 2
DanieleC 6 3 1 David I 4 6 2
Gileforn 6 6 3 atony77 1 2 0
scipio1zama 4 1 0 BrentS 6 6 3
spleen1980     3 Michael V forfeit forfeit 0
soul1st  no result no result 0 DaniloElMystico no result no result 0
Tomek 6 6 3 Milla 2 4 0
Metralhas     3 AnoN     withdrawn
      Deadline 03-May-21      

 updated 4 May

CUMULATIVE SCORES

Player Rnd 1 Rnd2
Hank 2 withdraw
AnoN 0 withdraw
gottoman 3 6
mk20336 3 6
Stanislav27 3 6
Bangla 3 5
Gonzo 2 5
Polonus100 2 5
Dawnreader 2 5
taliapharaoh 3 4.5
TTK 3 4.5
RiverWanderer 1.5 4.5
Marco 3 4
Gileforn 1 4
azzy 2 3.5
Rand 2 3.5
Mark-McG 1.5 3.5
toganalper 3 3
Renaud 3 3
Andygor 1 3
Moose 1 3
Benlore 1 3
David I 1 3
spleen1980 0 3
Tomek 0 3
BrentS 0 3
g1ul10 1.5 2.5
EZPickins 2 2
Alister 2 2
stephent 2 2
GomJabbar 1 2
PCScipio42 1 2
Cavie 1 2
DanieleC 1 2
LiamBN 1.5 1.5
atony77 0 0
scipio1zama 0 0
soul1st  0 0
DaniloElMystico 0 0
Michael V 0 0
Milla 0 0
Sir Kral withdrawn  
akima01 withdrawn  


Log in to comment

Mark-McG replied the topic:
3 years 11 months ago
Game1
Daniele (Eumenes) 6
David I (Craterus) 4

Game 2
David I (Eumenes) 6
Daniele (Craterus) 3

Regards.
Daniele
BrentS replied the topic:
3 years 11 months ago
OT21 Round 2 - Hellespont

BrentS - Scipio1Zama

Match 1
BrentS (Craterus) 6 - Scipio1Zama (Eumenes) 4

Match 2 
BrentS (Eumenes) 6 - Scipio1Zama (Craterus) 1

Two long , cagey battles. Both of us avoided taking the bait on Craterus' right. May have been different if either of us had drawn an opening Mounted Charge....a tough, high risk call. Mike played strongly, definitely got the rough end of the stick with the dice and the battles were closer than the banner count would indicate. This included a double helmet leader death on a chance range attack in the first battle.....very harsh in this scenario in particular. I also took the last banner with a leader kill in the second battle so it was a matter of chance that it ended as it did. 

Brent.
Gonzo replied the topic:
3 years 11 months ago
Match 1

Gonzo (Eumenes): 6 Banners
Alistir (Craterus): 4 Banners


Match 2

Gonzo (Craterus): 6 Banners

Alister (Eumenes): 4 Banners
Mark-McG replied the topic:
3 years 11 months ago
table updated.. 5 pairs still unreported, so make this weekend count and get those matches played
Milla replied the topic:
3 years 11 months ago

File Attachment:

File Name: Round2Game1.vlog
File Size:156 KB


Craterus (Tomek) 6
Eumenes (Milla) 2

Craterus began by moving his leader behind his light troops, while Eumenes advanced his infantry towards the enemy.  Craterus then ordered his light troops to fire and fall back.

Eumenes ordered his medium cavalry to charge the enemy on both flanks, attempting to attack Neoptolemus but losing a banner in the attempt.  In the following rounds Craterus was able to destroy a further two of the medium cavalry units.  Further conflicts on Eumene's left flank saw the loss of an auxilia from both sides.  Craterus then advanced his right flank, wiping out an auxilia and a light cavalry to win the battle.


File Attachment:

File Name: Round2Game2.vlog
File Size:158 KB


Craterus (Milla) 4
Eumenes (Tomek) 6

Both sides started advancing towards each other, with Craterus using a couple of line command actions to move towards the enemy, while Eumenes re-organised his right flank to protect his leader.  Several rounds of ranged attack followed, with minor casualties on both sides.

Craterus ordered his medium troops on his left flank to engage Eumenes's right, resulting in the loss of two of Craterus's banners.  Then a massive assault by Eumenes's medium units on both flanks resulted in both sides losing 3 banners each.

A last ditch attempt by Craterus's heavy infantry secured another kill, but it wasn't enough to turn the tide, and Eumenes won his 6th banner in the following round.
Polonus100 replied the topic:
3 years 11 months ago
Crateros (Polonus100) - 6
Eumenes (Stephent) - 4

File Attachment:

File Name: OT2021R2Polo.vlog
File Size:223 KB


Crazy battle. Crateros' Army attacks on both wings were somewhat unlucky with losses, but counterattack of Eumenides into  the fragmented Crateros' Center met First Strike from H with the disastrous 4 hits from 5D accuracy (without leader). The rest was simple coup of grace on Brown Army's Right made by Crateros personally.

Crateros (Stephent) - 1
Eumenes (Polonus100) - 6
 

File Attachment:

File Name: OT2021PolStev2.vlog
File Size:199 KB


Cards of Eumenes were the perfect ones. Mounted brought leader from Center to Left Wing of Cavalry and moved Right Wing cavalry with Eumenes closer to prepare the stroke. Many "Comand Left"  and one "Order Light" weakened Crateros' Right. And two consecutive Mounted Charges finished the affair on both wings. Heavy Crateros' infantry simply didn't fought.  Crateros fled off the board. Neoptolemos probably would do the same, but this (MC under him) was 6-th flag for Blues. 
 
RiverWanderer replied the topic:
3 years 11 months ago
Match 2
RiverWanderer  (Eumenes): 6 Banners
LiamBN (Craterus): 2 Banners

Craterus developed an attacking stance on his left but his formation was disrupted by some accurate ranged combat early on. On the other other flank, Neoptolemeus led his cavalry in combination with light infantry for a probing attack on right flank of Eumene's infantry line, rather than risk a deeper attack on Eumenes himself. Neoptolemeus was seen off but in good order, pursued by Eumenes. A poor Eumenes attack and a strong rebuttal, saw Craterus edge ahead at 2 banners to 1 and Eumenes pulling back.

From there, Craterus developed his main attack, bringing his centre forward to threaten a full assault on the, by now, fragmented Eumenes' battle-line. Increasingly pressed, the Eumenes' army reorganised and sent forward their left flank in a desperate bid to stem the tide. The gamble paid off, as an Auxlia unit was battered away in the last of 3 combats, allowing cavalry to breakthrough, taking out Craterus and his remnant cavalry.

The expected annihilation of the now over-extended Eumenes' cavalry did not come and instead it was Eumenes' right flank that took the heat. Given breathing space to press further attacks, it was Eumenes' left that brought the battle to conclusion, gaining the last two banners required.

Exciting game; thanks to Liam.


File Attachment:

File Name: 112Hellesp...iam.vlog
File Size:256 KB
Stanislav27 replied the topic:
3 years 11 months ago
Match 1

EZPickins (Craterus): 2 Banners
Stanislav27 (Eumenes): 6 Banners

Battle started very evenly after the first engagements. But when the two lines of infantry clashed, I had First Strike at just the right moment and the advantage of a leader in the centre - as well as useful cards and good dice - provided enough momentum to sweep all three of Craterus' Heavy Infantry and two Mediums from the field.

Match 2

Stanislav27 (Craterus): 6 Banners
EZPickins (Eumenes): 4 Banners

Game started fast and furious with John utilizing a Mounted Charge to great effect and me messing up with a bad Spartacus roll and a stupid lonely attack with Neoptolemus' whose unit died on the battle-back. John the counter-attacked the I Am Spartacus card to terrific effect - to begin with. His final Spartacus-driven attack on my left resulted in the luckiest outcome possible for me: My Auxilia rolled 3 blue to kill Eumenes' full-strength Medium Cavalry and even followed up with a Helmet on the LC1 roll. I went from feeling swiftly destroyed to being back in the contest, maneuvered my weakened units back and the battle lulled into long-range sniping. When finally the lines of infantry clashed, John had the better of it to begin with, but I regained some initiative with a Double Time and good rolls. The final unit fell on the battle-back.

Thanks to John for two excellent games. No doubt I had a bigger share of Lady Luck's ephemeral gifts this evening, but the contest was very close and hard-fought. 

File Attachment:

File Name: Stanvjohn1.vlog
File Size:225 KB

File Attachment:

File Name: StanvJohn2.vlog
File Size:215 KB
Andygor replied the topic:
3 years 11 months ago
Game1
GomJabbar  (Craterus) 6 - Andygor (Eumenes) 4
A difficult battle for Eumeneus. The loss of all the cavalry on the left flank gave Craterus the advantage. After that, the troops of Eumeneus took a blind defense, with difficulty bringing the score to 4 Banners of Victory.


File Attachment:

File Name: GomJabbarV...gor.vsav
File Size:116 KB
 

File Attachment:

File Name: GomJabbarV...gor.vlog
File Size:250 KB
 

File Attachment:

File Name: GomJabbarV...or2.vlog
File Size:191 KB
 

File Attachment:

File Name: GomJabbarV...or2.vsav
File Size:118 KB
Game 2
GommJabbar (Eumenes) 2 - Andygor (Craterus) 6
Eumenius forced the battle in the center. Stronger units of medium and heavy infantry attacked the Craterus auxiliary infantry, and almost destroyed them. Only the retreat flags saved the day. The attack of Eumeneus ' cavalry on the cavalry detachment under the command of Craterus was unsuccessful. Rallying the squad, Crater moved to the attack, which ended with the complete defeat of the cavalry detachments of Eumeneus. Eumeneus 'retaliatory cavalry charge was unsuccessful, and allowed the remnants of Craterus' detachments to take cover behind the lines of medium and heavy infantry. Eumenius rushed to finish them off, but also without success. The battle ended with the blocking of the commander's detachment of Eumeneus, and the destruction of the remnants of the detachment of medium infantry in the central sector.
PCScipio42 replied the topic:
3 years 11 months ago
Game 1- PCScipio42 (Craterus) 2 banners
             Moose (Eumenes) 6 banners

         Craterus aggressive move didn't pay off and was never able to play Clash of Shields he was needing to turn the tide.

Game 2- Moose (Craterus) 4 banners
             PCScipio42 (Eumenes) 6 banners

        Craterus got a heavy next to cav units at end of board to gain an additional 2 banners before Eumenes could get his 6th banner.


File Attachment:

File Name: MoosevPCS.vlog
File Size:193 KB
 

File Attachment:

File Name: MoosevPCS1.vlog
File Size:157 KB
Mark-McG replied the topic:
3 years 11 months ago
Game 1
Giulio (Eumenes) 6 Banners
Mark McG (Craterus) 5 Banners

A tense encounter that featured a lot of leader shielding. Only extreme circumstances pulled Eumenes from his corner.
The Craterid phalanx took an opportunity to double time into the Eumenid centre that was unsupported, and manged to break into the Eumenid centre, but the dice weren't smiling on Craterus that day, and the golden chance passed. The Eumenid response had Eumenes up 4-2 after some terrible fumbles by Neoptolmus, but he pulled a magnificent response to get 3 banners in a turn. Eumenes had to be very creative to lead his remaining cavalry to victory!
 

File Attachment:

File Name: R2G1_2021-04-25.vlog
File Size:236 KB

Game 2
Mark McG (Eumenes) 6 Banners
Giulio (Craterus) 2 Banners

Outstanding missile fire from the Eumenids had 3 banners on the track before the armies even clashed. This game is probably the most outstanding dice and cards I can recall, especially the missile fire. I was never short of a card, and at the end game when Craterus was breaking my line, I drew cavalry charge that almost effortless took 2 final banners from full strength Auxilia.
I lost 11 blocks, Giulio 30
 

File Attachment:

File Name: R2G2.vlog
File Size:234 KB
Bangla replied the topic:
3 years 11 months ago
Yes Mark, that's correct.
Apologies for the formatting. I dunno what happened. It al looked good when I was posting it.
Mark-McG replied the topic:
3 years 11 months ago
so to confirm please

Game 1
Bangla (Eumenes) 6 Banners
Marco (Craterus) 3 Banners


Game 2
Marco (Eumenes) 6 Banners
Bangla (Craterus) 5 Banners

 
Bangla replied the topic:
3 years 11 months ago
OT2021 Round 2Game 1Bangla (Eumenes) 6 BannersMarco (Craterus) 3 BannnersWell, this was one of the longest CCA games I've ever fought.  Most are over within 75 minutes tops, but this one was very cagey.  No initial charge from Craterus and his cavalry.  Instead Craterus redeployed himself to the centre, retired the cavalry, and put his bowmen out to harass the Eumenid lines.  It was an opportunity too good to miss, with the bowmen being surrounded by the LC and two MCs.  But somehow no banners were forthcoming to eliminate the light troops and they held firm.  The LC was then cut off and destroyed in turn, and the first banner went to Craterus.After that there developed a game of cat and mouse and both sides tried to manoeuvre to get the odd block kill from ranged fire and at the same time protect their lines of retreat.  The Eumenid centre line even advanced and then retreated as they sought to ensure their flanks couldn't be exposed.  Eventually Craterus brought his whole line forward to set up an attack.  Eumenes reacted swiftly, picking out the weakest HI (no leader support) and eliminating it pronto.  The big surprise was a MI also wiped out a second HI with an instantaneous 4-block kill.  That stunted the attack somewhat, but Craterus pushed on and got a 4-block kill of his own.  The battle was swinging in Craterus' favour and he looked like another kill was set up.  Eumenes played a First Strike and then rolled another 4-block kill!  That made it 4-3 to Eumenes, and a mounted charge eliminated two 1-block units, including those pesky bowmen who were by now on their own baseline.  A long game that came to a quick end once the two lines had joined, and a result that was turned on the success of a First Strike card.Game 2Marco (Eumenes) 5 BannnersBangla (Craterus) 5 BannersThis battle was totally different from the 1st.  The Eumenid MCs advanced on the left, Craterus attacked and eliminated one, then advanced to take out the LC too.  But in doing so he left himself exposed, was cut off, and Craterus then failed his leader escape after his cavalry were eliminated.  2 banners apiece, but the Craterus side down a leader and a card.  After that, Eumenes clearly had the upper hand, but it would take a while for him to bring his troops to bear.  The Craterus right flank advanced to try and keep him off balance, then the left came forward to challenge there too.  When the Eumenid right advanced as well, after peppering the Craterus line with fire, they were hit with a Clash of Shields that eliminated a third unit.  Given their dire situation, Craterus side were looking for a 4th banner to the tie overall.The Eumenid army began to press,  Craterus went after a lone MC on the Eumenid left.  Just before the pressure might tell, the MC was forced off the field for that 4th banner.  Then the HI hit home.  That gave Eumenes a 5-4 lead and the battle looked won.  A cavalry charge took out one of the HI to make it 5-5, but the momentum was now with Eumenes and he found the 6th banner in the nick of time.  The Eumenid army did have 2 attempts to kill the second leader, and win the game earlier.  One of them was a single d6, but both attempts failed.  In the end, an excellent battle, and a fair result.
TTK replied the topic:
3 years 11 months ago
Thank you Travis
It's not enough to beat you
You also need to be knocked down

As soon as I forget about it, I get hit with a bat on the knuckles of my fingers, which I use to press the keyboard...

very difficult for me both games
deserved 1.5 points
RiverWanderer replied the topic:
3 years 11 months ago
Match 1

LiamBN (Eumenes): 2 Banners
RiverWanderer (Craterus): 6 Banners

Skirmishing on the flanks put leaders from both sides in early jeopardy but the situation resolved to an exchange of cavalry. The sides fell back on opposite flanks with Craterus maintaining a strong attacking posture.

As Alcetus began to lead Eumene's centre forward, Craterus light troops gave a good account of themselves, targeting vulnerable units and Alcetus himself. Craterus' centre reorganised behind a shield of light units. Alcetus' attack at last hit home but his lead unit had been weakened and was eliminated when its bonus combat came up one hit short. Now Craterus closed in on a second weakened unit in Eumene's attack formation, gaining the final banner.

Match 2 is scheduled for next week.


File Attachment:

File Name: 112Hellesp...ark.vlog
File Size:227 KB

 
Benlore replied the topic:
3 years 11 months ago
Match 1
Cavie(Eumenes):   6 Banners
Benlore(Craterus): 2 Banners

A long battle as Craterus charged early down the right flank and was killed in a double time by the Alectus out of the center. The Eumenes then went to work on Neoptolemus who pulled the remnants of the early conflict into a hard turtle formation in the centre. Eumenes picked off the rest for a drawn out victory.

Match 2
Benlore(Eumenes): 6 Banners
Cavie(Craterus): 1 Banner

This battle was quick. Eumenes set up a double mounted charge to take three banners and push Neoptolemus off the board. Craterus managed to take a banner on the left flank, but it was too late as Emumenes moved up the centre to finish off the beleaguered retreating light troops with a double time.  
Dawnreader replied the topic:
3 years 11 months ago
Round 2 Game 1

Dawnreader Vs. Hank

Dawnreader - Eumenes - 6 Banners
Hank - Craterus - 5 Banners

Craterus with heavy infantry struck on the right flank and destroyed Bowmans. Then medium infantry attack followed on left-wing wiping out 2 auxiliaries. Eumenes with cavalry counterattacked and killed 3 medium infantries, Neoptolemus survived through 5 leader checks. 2 cavalry bands of Eumenes attacked heavy infantry with Craterus leading them and ... died from battle back strikes. Craterus with heavy infantry and auxiliaries started the final push on right-wing trying to score the last banner. Medium and heavy infantry with Alcetus leading the counterattack moved forward to the enemy and scored two final heavies with it. Eumenes wins.

File Attachment:

File Name: ancients_O..._g1.vlog
File Size:233 KB

 
Rand replied the topic:
4 years 1 hour ago
Round 2 Game 1

Azzy Vs. Rand

Azzy - Eumenes - 6 Banners
Rand - Craterus - 3 Banners


Eager to close ranks, Craterus' army breaks forward with two Line Command cards played in a row. This leaves Craterus himself exposed to withering fire from archers and his unit is destroyed by a follow-up cavalry attack. This attack also damages two auxiliary units, but the battle back takes its toll on the cavalry of Eumenes. After a further cavalry charge, the center of Craterus' Army surges against the main line of the enemy. A well-timed counter and hot dice destroys two medium infantry and a heavy infantry, leaving Neoptolemus isolated and alone in a victory for Eumenes.


Round 2 Game 2

Azzy Vs. Rand

Azzy - Craterus - 3 Banners
Rand - Eumenes - 6 Banners


Craterus starts his advance in the left flank, but is thwarted by an all-out mounted charged by the cavalry of Eumenes, who leads the charge on the right flank. In the first melee, Craterus is cutdown, reducing the command of his army by one card. two auxiliary and a medium cavalry are also heavily damaged. The counter by Craterus' remaining general, Neoptolemus, destroys Eumenes' medium cavalry unit, but it costs him two auxiliary and heavily damages a medium cavalry of his own. Eumenes is then chased down and killed, removing a card from his command. Light skirmishing on the left finishes off Craterus' former unit and the remnants of Eumenes' cavalry withdraws as the infantry on both sides march towards each other. Neoptolemus overextends one of his medium infantry units, which is cut off and destroyed by infantry led by Alcetus. A momentum advance then destroys Neoptolemus' own unit and ends the battle.


Big thanks to Azzy for two exciting battles, both were incredibly close and extremely fun. Good luck to him in the rest of the tournament.


File Attachment:

File Name: AzzyVsRandR2G1.vlog
File Size:166 KB
 

File Attachment:

File Name: AzzyVsRandR2G2.vlog
File Size:154 KB
taliapharaoh replied the topic:
4 years 2 hours ago
Two fantastic games that both came down to the narrowest of margins. (I have come to expect this every time playing TTK)

Game 1

TTK - Eumenes - 6 Banners
Travis - Craterus - 5 Banners

Game one was a back and forth struggle, one that came within a single block of a 6-3 Craterus victory.  After some unlucky rolls, the Eumenes cavalry on the right was gone and the fighting settled in the center.  Both sides fought valiantly, but the final banner was gained in a desperate cavalry charge following a failed attack on a weakened HI.  Expertly played by TTK as usual.

Game 2

Travis - Eumenes - 6 Banners
TTK - Craterus - 5 Banners

After much maneuvering, the 2nd game devolved into a slugfest which largely played out in the center as well, with TTK hammering away with the steadfast Craterus infantry to gain a 5-4 lead.  A desperate mounted charge (the 2nd in a row), eliminated two Crateran units well away from the fighting to gain the 5th and 6th banner and snatch victory from the jaws of defeat, in a very similar way to the first match. 

Very fun and thrilling games!
gottoman replied the topic:
4 years 4 hours ago
Match 1Greg O (Craterus): 6 BannersTogan Alper (Eumenes): 5 BannersCraterus took two banners on the right for an early lead and reformed his lines and then Double Timed into battle, while the Eumenes countered with a fierce Mounted Charge on the left that left a triangle of Craterus' lights huddled on the backline.  Craterus cared little for his light troops and drove all the way to the Eumenes baseline as he started to chew through the units in his path.   The Eumenes continued to press the left, leaving a sol surviving Aux on the baseline who was quite vulnerable.   Craterus continued to race against time continuing his lone assault, which ended up winning the game in the end likely at the last moment possible.Match 2Greg O (Eumenes): 6 BannersTogan Alper (Craterus): 0 Banners

Both sides moved towards each other in good order.   Eumenes missile fire weakened the Craterus center while Craterus truck first on the left.   Eumenes then double timed into the weak spot of the Cretarus line that also was without support of any leader.   The Eumenes punched through the line and caused casualties.   Craters struck back into the Surging Eumenes forces but there attacks had little effect and left three weakened units that were eliminated in the next Eunemes play.

A tough day for Togan, but he's always fun to play with and you must have luck and cards to hang in there against him, and I had both today, thanks to Ares' blessings.
mk20336 replied the topic:
4 years 2 days ago
Match 1
Renaud (Eumenes): 1 Banners
mk20336 (Craterus): 6 Banners

Another quick and furious battle, with Craterus charging in first turn for 2 VPs, and then rolling the flank. All my rolls were perfect, all cards I needed I had. There was not stopping Craterus this day.

File Attachment:

File Name: OT2021_R2_g1_log.vlog
File Size:167 KB


Match 2
Renaud (Craterus): 3 Banners
mk20336 (Eumenes): 6 Banners

Renaud started exactly like I did in first game - with Mounted Charge. But it did not worked so well. The game transformed into battle of maneuver, with Eumenes lead 3-1 only to be checked by Craterus to 3-3. Once I brought my Hi to fight, things started to change - in last turn Eumenes forces gained 3 banners finishing the game.

Thanks to Renauld for flexibility in organizing our games!

File Attachment:

File Name: OT2021_R2_g2_log.vlog
File Size:226 KB
RiverWanderer replied the topic:
4 years 4 days ago
Calling LiamBN... please see your private messages. Or @Mark McG - do you have an email address for him?

Mark
Gileforn replied the topic:
4 years 1 week ago
Match 1

Atony77 (Eumenes): 1 Banners

Gileforn (Craterus): 6 Banners

That was a very fast battle, were dice were not on the Eumenes side. Attack by cavalry step by step destroyed the left Eumenes flank. Cavalry charge helped Eumenes to take a banner by destroying Craterus' cavalry.

Match 2

Atony77 (Craterus): 2 Banners

Gileforn (Eumenes): 6 Banners

This game was longer, but also dice helped to Eumenes. Line command and other orders helped for maneuvres. The cavalry on the right flank tried to something special, but was stoped by auxilia. Spartak came twice to Craterus and made some problems for the Eumenes. Heavy infantry after rally have taken the last banner.

File Attachment:

File Name: AOT2.vlog
File Size:148 KB

File Attachment:

File Name: AOT22.vlog
File Size:185 KB