Historical Background
“Intermittent rain fell on the [Roman] soldiers as they shivered in ranks, and the enemy battleline was obscured by a dense bank of fog. As the sun rose, burning off the mist, the teenaged skirmishers in the front line saw before them an enormous horde, the combined strength of Asia. Dense ranks of pikemen presented an impenetrable mass of iron, ash-wood and bronze, above which loomed the shadow of elephants. From a distance it seemed that the Romans confronted not an army, but rather the walls and towers of an impregnable city. More dangerous was a long line of cavalry, both horse and rider heavily armoured, specifically massed to crash through the Roman legions. Among the metal-clad troopers was the hostile King himself, prepared to personally lead the charge against the Roman invaders. Scanning his foe, the King identified a weakness in the Roman line, and on his command his cavalry surged forward: 16,000 hooves pounded across the plain. Any Roman who believed the bellicose rhetoric promising an easy victory over the effeminate Greeks and Asians knew now that he had been badly deceived. Panic gripped the overstretched Roman infantry line, and the legionaries turned and fled back toward the ramparts of their camp. The entire Roman left wing collapsed before the horsemen of Media, Phrygia, and Syria. In hot pursuit of the fleeing Roman infantrymen was the Great King himself, Antiochus III.” Antiochus the Great, by Michael Taylor.
The stage is set. The battle lines are drawn and you are in command. The rest is history.
War Council
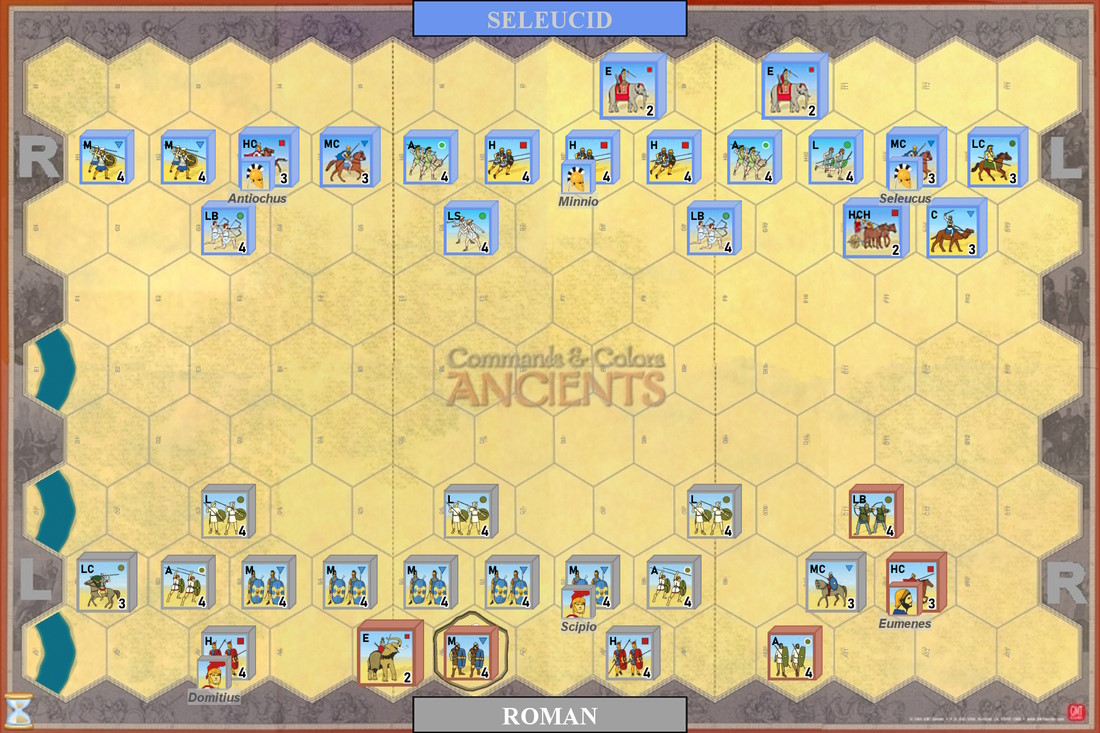
Seleucid Army
Take 4 cards.
Roman Army
Take 6 cards.
Move First ![]() .
.
Victory
9 banners
Special Rules
Seleucid Cataphracts: The Seleucid Medium Cavalry units are heavily armored cataphracts. These units may ignore one sword hit in combat. They are treated as regular Medium Cavalry in all other respects.
Roman Camp: The Seleucids gain one victory banner if any Seleucid unit enters the Roman camp.
Royal Father and Son: The Romans gain one extra victory banner if both Antiochus and his heir Seleucus are killed in battle.
No Roman Tactical Flexibility: This scenario omits this optional rule from the official scenario. The Romans’ tactical superiority is reflected in their significantly larger hand size.
River Phrygios: The river is impassable.
Roman Allies: The Carthaginian blocks are used to depict Rome’s Pergamene allies and African elephants. This is purely for aesthetics and flavor, and has no effect on gameplay. There are no special rules constraining the brown blocks’ activation or use by the Roman player, and regular gray Roman blocks may be substituted if so desired.
Optional Alternate Setup: The historical sources are unclear about the placement of the Seleucid argyraspides (Silver Shields) in the battleline. This elite corps is represented by the two Medium Infantry units are the far right end of the Seleucid line. Players are invited to experiment with an alternate, historically plausible setup, by switching these two units with the adjacent Heavy Cavalry and Medium Cavalry blocks (along with their attached leader Antiochus). We expect that this alternate setup would be a slight improvement for the Seleucid side, insofar as it consolidates their infantry.
Design Notes
This setup draws inspiration from the Magnesia scenario featured in War Elephant expansion to GMT's SPQR. The map is generally featureless, with the River Phrygios impinging only slightly on the Roman left flank, in order to maximize the battle space and allow for a more linear deployment of the two armies. Below are a few notes on the forces, unit placement, and special rules.
First, while Livy's traditional account indicates that the Seleucids enjoyed a huge numerical superiority of more than 2:1 at Magnesia, modern historians have cast doubt on these figures and suggest that the forces were much more balanced, which is reflected in the size of the two armies.
I share Hans Delbrück's skepticism that the Seleucid elephants would have been interspersed between the ranks of their citizen phalanx. I have placed one elephant unit just behind the phalanx to represent a unified formation, and to prevent them from stampeding through the heavy infantry prematurely in response to Roman missile fire (which did indeed happen, but only in the final stages of the battle).
I have also chosen to omit the Roman Tactical Flexibility rule from the official scenario. This superiority is reflected in the Roman player's substantial 6-4 card advantage, and at least according to Appian the Seleucid phalanx acquitted itself rather well in this fight, redeploying to form the defensive plinthion hedgehog formation, which the legionnaires bombarded with their pila but hesitated to attack directly hand-to-hand.
The Seleucids’ Galatian and Cappadocian mercenaries are both represented as auxilia. As at least one other scenario designer has noted, using warrior units to depict the Galatians here dramatically overstates their ferocity and battlefield performance. The Seleucid cataphracts are represented by a special unit, a cataphracted version of medium cavalry, which reflects the greater protection which enabled them to achieve success against the Roman left wing.
After much consideration, I have represented the small detachment of Roman cavalry guarding Scipio’s left flank as a light cavalry unit, striking a compromise between using a medium cavalry unit, which feels overpowered, and no cavalry at all, which would be ahistorical.
Livy's description of the Seleucid deployment omits the elite argyraspides (Silver Shields), who were undoubtedly present at the battle; this apparent error has caused considerable confusion in the centuries since. I have adopted the SPQR setup here, which places the argyraspides, represented as medium infantry, at the extreme right of the Seleucid line, an interpretation which is echoed by historians Michael Taylor and Jean Charl Du Plessis. However, the scenario also offers the players a plausible alternate setup, which places these crack troops to the right of the main phalanx.
Many thanks to my friend Elliott Becker who assisted me in playtesting this scenario and contributed numerous ideas and suggestions, particularly with regard to balance and playability.