Victory Results:
 63 %
Record a victory for BOTTOM ARMY  38 %
Total plays 8 - Last reported by Pevans on 2024-07-13 20:52:25

HISTORY DETAILS
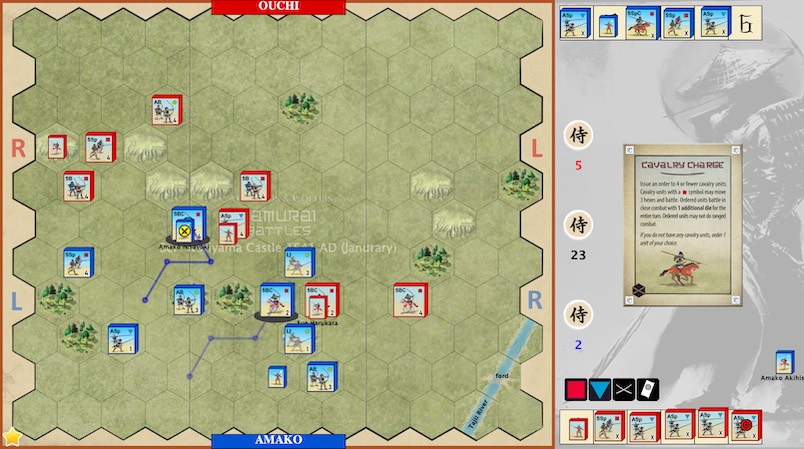
In late December, Sue Harukata arrived with the Ouchi relief force. Motonari decided to strike again and ordered Harukata to guard his rear with the Ouchi, while he moved to attack the Amako allied camp at Miyazaki Nagao. But Harukata had no intention of waiting to do battle and seeing that Akihisa’s main camp was inadequately defended, also attacked. Amako Hisayuki's bold charge to check the Ouchi did not slow their advance and the Akihisa’s camp was overrun. Losing both camps in the days fighting, Akihisa took council and after months of fighting choose to lift the siege.

The stage is set, the battle lines are drawn, and you are in command. Can you change history?


Command Tent Ford Forest Hill River
1 1 7 6 2


Ouchi Samurai Army (Red)
Move First
Command Card Command Card Command Card Command Card Command Card Command Card
Dragon Card Dragon Card Dragon Card
Honour & Fortune Honour & Fortune Honour & Fortune Honour & Fortune Honour & Fortune

Ashigaru Yari Ashigaru Bowmen Samurai Bowmen Samurai Spearmen Samurai Bowmen Cavalry Infantry Leader Cavalry Leader
5 1 2 2 2 2 2

Amako Samurai Army (Blue)
Command Card Command Card Command Card Command Card Command Card
Dragon Card Dragon Card
Honour & Fortune Honour & Fortune Honour & Fortune Honour & Fortune Honour & Fortune

Ashigaru Yari Ashigaru Bowmen Levies Paesant Irregular Infantry Samurai Spearmen Samurai Spearmen Cavalry Samurai Bowmen Cavalry Infantry Leader Cavalry Leader
3 2 2 2 1 2 2 2

Victory
6 Banners
• 1 Victory Banner for each unit or leader eliminated.
• The Amako Command Tent, although not occupied by a command unit is still worth 3 Victory Banners to the Ouchi player when occupied at the start of his turn and removed. When the Command Tent is removed, the Amako player must discard one of his Command cards at once, selected at random.

Special Rules
• The River Tajii is impassable except at the river ford.


Log in to comment

Pevans replied the topic:
9 months 6 days ago
Nephew Tom had a week off work at the end of May and we fitted in a couple of sessions picking up where we'd left off 14 months ago with this scenario.

My initial hand as the Ouchi allowed me to make a sustained attack in the centre, letting me punch through with my samurai and take the tent. However, this left me with two samurai units on their own in the middle of the Amako army, which was still in good order. The score's 4:0, comprising three for the Command tent and one fallen Amako unit, while my forces are intact.

My samurai made a fighting retreat from their exposed position, ashigaru spearmen coming to support them. However, I lost one samurai, one ashigaru and a leader as Tom fought back to 4:3.

We swapped ashigaru in the centre, 5:4, before I got my samurai horsemen into the fight on the left, the final banner being an Amako leader.

We re-set the board and swapped seats for the re-match. Initial manoeuvres let me get my army into a contiguous line (I had a "Serpent Command" card to move the entire force in one go). However, Tom disrupted this by attacking in the centre, heading towards the command tent. I took out two ashigaru units and pushed back the rest. So the score is 2:0 to me.

Tom then outflanked me on the right with the two mounted samurai, riding down one of my ashigaru - 2:1.

As Tom rolled up my right flank with his cavalry, I attacked with my centre and left cards. However, he had better luck than me, taking out another three units and a leader to my one. And my mounted samurai bowmen got cut off in the centre for Tom to eliminate them as the coup de grace.

The final score was 3:6, making the overall score for this scenario 9:10 to Tom.

I’ve also posted this report (with pictures!) on my BGG blog: boardgamegeek.com/blogpost/162885/samurai-battles-in-may
RiverWanderer replied the topic:
3 years 5 months ago
I enjoyed a close game of this scenario as Blue. My opponent advanced to form a strong attack on the centre. I scraped a win 5:6, which could have gone the other way had a die roll been different in any of 2 or 3 places.

My chances looked strong after "Physician" brought back a Samurai Spearmen from the brink in the centre (benefit of the Command Tent) and White Dragon blunted Red's attack.  Still, from 1:4, Red came back with a strong response. Rice Famine took Blue's last remaining H&F and subsequent Lack of Honor rolls weakened several Blue units and helping the scoreline to 4:4. The melees continued, sweeping up a weakened unit on both sides. Lack of 1 more hit on Red's last melee gave Blue the last turn; cavalry charge bonus combat finally catching a retreating 1 block Red Ashigaru Infantry Spearmen unit.

 
NightOwl3 replied the topic:
3 years 7 months ago
Going into the scenario it seemed that Red would win. I decided to go straight for the tent and crush the weak green units. I also wanted to swing my bow CAV and hit the isolated medium troops on my left near the river. I got a good start, but then Judd went into a great defensive position by pulling back and getting his troops together. We had some back and forth, but I finally made contact on his right and weakened several units. I also got two flags by taking out a medium troop and a leader. Judd also pushed up a samurai cav on his left/center threatening to break my line. I hit his right and got two more banners, but did not deliver the knock out. He responded well, and with is spear Cav took out three of my units all samurai. I pulled back my remaining troops on his right to avoid a CAV charge. It took two attempts but I finally took out that bow CAV and got a good roll to get its leader as well. We ended up 6-3, but it was closer than the score shows. I may have pushed a bit too much given his defense. I tend to forget that those samurai bowmen roll 3 dice.