Historical Background
Saladin had attempted to gain control of Aleppo and Jerusalem in 1175 but was thwarted. Then in 1177 when most of the Crusader field forces were off elsewhere involved in a siege, he was ready to try again. Believing that his forces were not in danger as he marched to Jerusalem, Saladin allowed his army to be spread out over a large area to pillage and forage. The small number of available Crusaders were led by the Baldwin IV, the ‘leper king.’
He followed Saladin and finally caught up near Montgisard. When Baldwin attacked from out of the hills, Saladin was taken totally by surprise. His army was in total disarray and quickly went into a state of panic. Saladin’s nephew Taqi ad-Din attempted a counter-attack while Saladin tried to organize his guards and reform his lines, but his units were quickly defeated in detail. Thus. a much smaller Crusader army was able to defeat a much larger one by concentrating superior force against each fragment of Saladin’s army. Saladin himself, as history records, only avoided capture by escaping on a racing camel. History also records that no more than one in ten of Saladi’s army survived to reach Egypt. Saladin needed several years to rebuild his forces. This action was one of the most famous involving Military Order knights. Both the Templars and Hospitallers claimed credit for the victory.
The stage is set. The battle lines are drawn and you are in command. Can you change history?
War Council
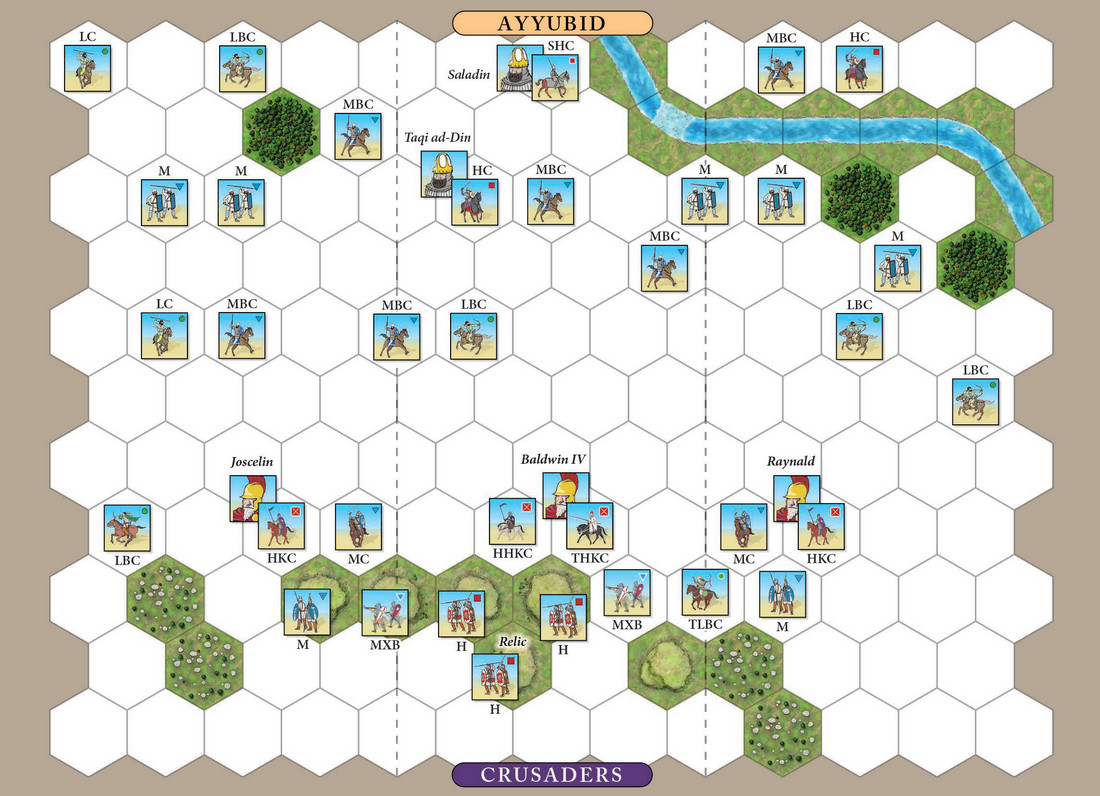
Ayyubid Army
• Leader: Saladin
• 2* Command Cards
• 2 Inspired Actions tokens
 |
 |
 |
 |
 |
 |
 |
| 2 | 5 | 2 | 4 | 6 | 2 | 1 |
Crusaders Army
• Leader: Baldwin IV
• 5 Command Cards
• 4 Inspired Actions tokens
• Move First ![]()
 |
 |
 |
 |
 |
 |
 |
 |
 |
 |
| 3 | 2 | 2 | 2 | 2 | 3 | 1 | 1 | 1 | 1 |
Victory
7 Banners
Special Rules
- The Ayyubid player starts with two Command cards (Saladin is surprised and forces are disorganized). At the end of turn 1 draw two Command cards. At the end of turn 2 draw two Command cards. After turn 2, the Ayyubid player’s hand size is four Command cards and will stay at four cards for the rest of the battle.
- Retreat and Panic rule is effect for all Ayyubid units.
- The Relic rule is in effect for the Crusader player. In this scenario the relic is placed with a Heavy Infantry unit.
- All Ayyubid Medium cavalry units are armed with bows, place bow markers. Heavy cavalry units are not armed with bows. Some Light Cavalry are armed with bows. Use the proper bow and non-bow Light Cavalry blocks for these different units.
- The Stream is only passable at the ford.
Q4. scenario Montgisard on the crusader left, there is an LBC.. should this be a TLBC?