Historical Background
On the 4th Guy’s center position became desperate. His center formation had advanced into greater danger and almost reached the Hills of Hattin. Once in sight of the hills many of Guy’s desperately thirsty and demoralized soldiers bolted for the hills seeking water and refugee. In the end, however, most were either killed or captured without offering much resistance. Saladin’s entire army was now concentrated against Guy. The knights remaining with Guy, plus a few mounted units from the Van and Rear columns, found the strength to mount one last charge, but it was turned back. Guy had now lost all hope and ordered his tent to be set up and the knights to dismount. Numerous attacks from all sides were thrown back, but in the end Guy’s tent fell and Saladin had his victory. The Military Order knights had been the most stalwart defenders. Instead of holding the survivors for ransom, Saladin had them put to death so he would not have to face them again.
The stage is set. The battle lines are drawn and you are in command. Can you change history?
For decades the Crusaders had successfully defended their territories using a combination of garrisoned strategic castles backed by mobile reserves. Most of those vital troops had marched off to destruction at Hattin. Left with insuffcient forces, most of the Crusader kingdoms fell quickly to Saladin, culminating in 1099 with the fall of Jerusalem.
War Council
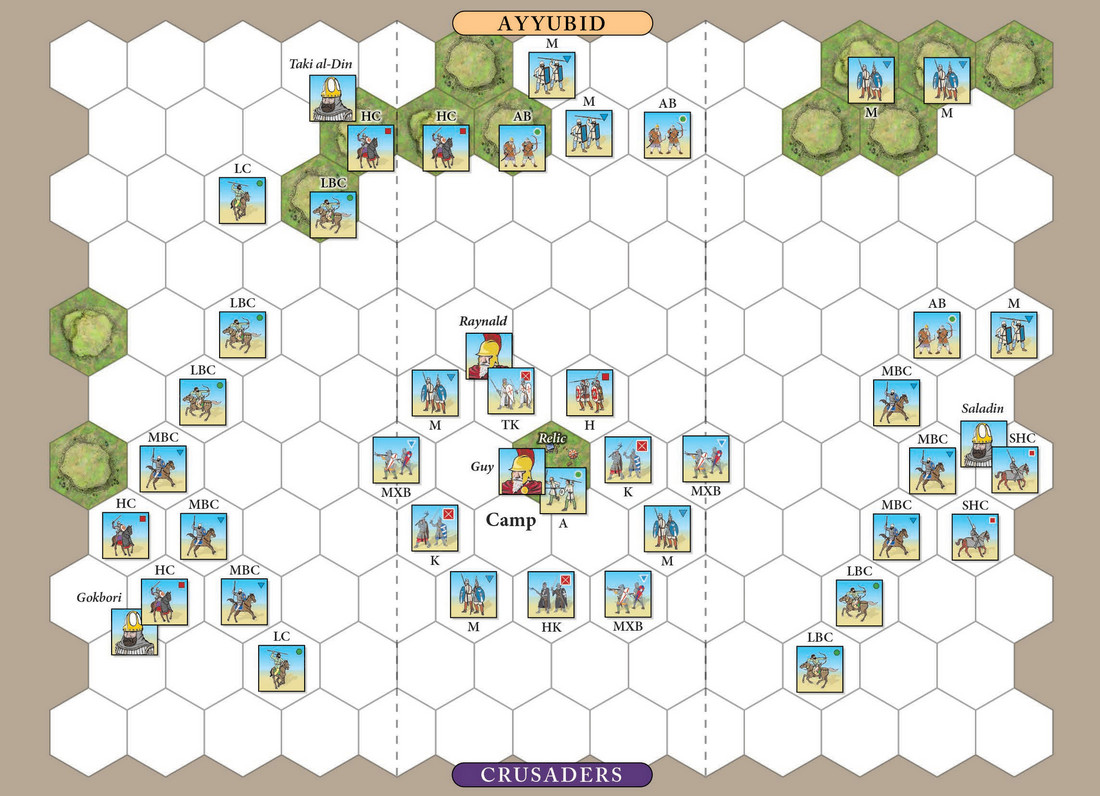
Ayyubid Army
• Leader: Saladin
• 6 Command Cards
• 4 Inspired Actions tokens
• Move First ![]()
 |
 |
 |
 |
 |
 |
 |
 |
| 3 | 3 | 5 | 2 | 5 | 6 | 4 | 2 |
Crusaders Army
• Leader: King Guy
• 6 Command Cards
• 2 Inspired Actions tokens
 |
 |
 |
 |
 |
 |
 |
 |
| 2 | 3 | 3 | 1 | 1 | 2 | 1 | 1 |
Victory
7 Banners
Special Rules
- The Crusader player starts with 6 Command cards. One Command card is lost for each Crusader unit and/or leader eliminated, until the Crusader player’s holds only 3 Command cards. A Command card when lost is selected at random at the end of the turn.
- If an Ayyubid unit occupies the Crusader camp at the start of the Ayyubid turn, the camp hex is removed and the Ayyubid scores an immediate victory.
- The Relic rule is in effect for the Crusader player.
- Retreat & Panic rules are in effect for Crusader infantry units.
- All Ayyubid Medium cavalry units are armed with bows, place bow markers. Heavy cavalry and Super Heavy cavalry units are not armed with bows. Some Light Cavalry are armed with bows. Use the proper bow and non-bow Light Cavalry blocks for these different units.
- All hill hexes are considered rugged terrain and are treated as Broken Ground that also blocks Line of Sight.